
Bread Baking Success
September 19, 2009 by The swedish meatball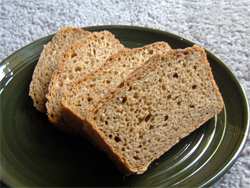
My first attempt at Peter Reinhart’s rye meteil was a slight disappointment. The crumb was too dense. The crust wasn’t perfectly golden brown, crisp and chewy. The flavor was definitely an improvement over active-dry yeast bread, but the wild yeast probably could have used a bit more maturation. Finally, the single free standing loaf was huge, oblong and unsymmetrical (due to a mishap during transfer of the bread to the oven); in short, it was an unwieldy beast.
But one never becomes a baker without a second attempt (and a third and a fourth…), so I resolved the second time to make a few adjustments.
And what success! The crumb, which you can see in the picture above, was perfect. The crust was chewy and perfectly browned. Even the flavor improved a little; there were notes of onion and bitter with a subtle finish of sweet and lingering sour. How can we explain these results? Well here’s a few remarks about round two’s procedure:
- If I was going to face another possible flop, I at least wanted the shape of the bread to be a little more manageable. So I test drove my new cast iron bread pans. See my remarks about cast iron baking below the procedure notes.
- I used the same mother starter for both the second and first attempt. However, for the second experiment, both the mother starter and final starter were more mature (thanks to the fridge). I also distinctly remember the mother starter having a noticeably more acidic-vinegar smell.
- Less flour was incorporated during kneading, resulting in a much more tacky dough.
- In addition to the steam-pan on the lowest oven rack, I also misted water onto the sides of the ovenonce every minute for the first five minutes.
Having grown up in a house with a beautiful cast iron skillet, I absolutely adore cast iron. It’s non-stick. It heats evenly. It’s versatile and can be used on the stove top or in the oven. And best of all, cast iron lasts decades with a little care. But using cast iron for yeasty bread baking is a sticky wicket. You need to let the dough’s second fermentation occur inside the cooking vessel; meaning, the dough needs to rise for about 45 minutes outside the oven in the bread pan. However, bread bakers recommend pre-heating the oven and the cooking surface (e.g. pizza stone) prior to placing the bread in the oven. To complicate matters, while cast iron is safe for the oven, it can crack if there’s a sudden change in temperaturesay, for example, when you transfer a cold cast iron pan into a 425°F pre-heated oven.
Update 08/25/09: I’ve tested several solutions to these demands. In all cases, first allow the loaf to rise in the bread pan. When ready to bake, you can place the cast iron pan (a) in an inch or so of very hot tap water, (b) on a cool burner, which is then turned on to its lowest setting, or (c) in an oven preheated to 200°F. I prefer using option (b) as it keeps the cast iron dry and allows me to preheat the oven to the target temperature with no fuss. Let the bread pan get hot on the burner and then airlift directly into the oven.